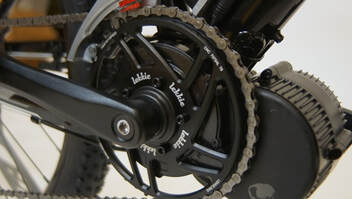
ELECTRIFY BIKE
  • Shop
    • Mid-Drive Motor Kits >
      • BBS02/BBSHD - BAFANG
      • TSDZ2 - TONG SHENG
      • CYC MOTORS
    • Batteries
    • Parts & Accessories
    • Specialty Kits >
      • Xtracycle Kit
      • Madsen Kit
      • Cruiser Kit
      • Airline Travel Kit
      • Cargo Bike Kits
    • E-bikes >
      • Electric Mountain Bikes
      • Electric Fat Tire Bikes
      • Electric Cruiser Bikes
      • Electric Cargo Bikes
      • Tandem Electric Bikes
    • Scooters
    • Conversion Quote
    • All Products
  • Rentals
  • Info/Blog
    • E-bike Conversion 101
    • Electrify Blog
    • Technical & DIY Info
    • Manuals & Resources
  • E-Bike Gallery
  • About
    • About Us
    • Contact
    • Customer Reviews

How to mount a downtube battery on a frame that is too small

2/14/2021

0 Comments

 
We have attempted to install a Super Shark battery in a bike frame that is barely too small many times.  The battery will actually fit in the space available in the triangle (see picture below) ​but there is no room to slide it on and off of its mount.  Since the mount cradle requires that you mount it to the water bottle mounts first and then slide on the battery, there is no way to mount the battery.  That is, there was no way before Grin Technologies invented the Bottle Bob and Triple Bob. Now it is easy if you don't mind a semi-permanent battery mount where you just leave the battery on the frame all the time.  Hey its better than the alternative!
Picture
To mount the Triple Bob in the smallest space possible on a frame that has no room to take the battery on and off once it is mounted, first attach the battery mount to the Triple Bob.  Then attach the battery to its mount and lock it in place.  Then position the battery in the frame and lock it down with hose clamps through the Triple Bob.  We do this all the time to install batteries in frames that are a tight fit with no room to take the battery off once mounted.  We used to do it with zip ties and holes drilled into the battery mount but Triple Bob's are so much better.
Picture
Triple Bob
Picture
Bottle Bob
As an alternative, you can also do this with Bottle Bob's.  They are a tiny bit shorter and we have on occasion even filed them down a few millimeters in especially tight frames.
Picture
Another technique for installing a downtube battery if it won't fit in the triangle like on a lot of full suspension bikes, is to mount it on the bottom of the downtube.  Place it as far down toward the mid-drive motor or bottom bracket as possible considering other clearance factors and lock it down with a Triple Bob and hose clamps.  If you have a suspension fork, let all the air out of it so you can completely collapse it and check that the tire will not hit the battery if the suspension bottoms out.  If it bottoms out going off a jump or hitting a rock or curb it could damage the battery.  That said, I have had a few people mount it there anyway and either lock out the fork, or add air pressure and promise to never go off a jump. 😯

For more info on Triple Bob's check out this article.
0 Comments

Why you should always use a Triple Bob to mount a down-tube battery

2/14/2021

0 Comments

 
Let me qualify that.  We have tried the Triple Bob from Grin Technologies with all of the Reention shark-type cases we use and most of the Hailong shark cases and it dramatically improves the strength and rigidity of the mount every time.  We are now recommending them with all of our downtube batteries.  While they improve every mount, they are most important on Jumbo Sharks and Mega Sharks.  These weigh from 9 to 12 lbs and are taller so there is more side to side leverage pulling on the mount.  With a Triple Bob, the battery is on there rock solid and doesn't move.
Picture
The problem being solved comes from the fact that the bottom of these batteries is flat and the downtube is round.  This leaves only a few M5 bolts to hold the entire weight of the battery against any side to side forces. This often leads to a battery that "wiggles" from side to side or in some cases "flops" from side to side even with the bolts fully tightened.
The ingenious cure Grin came up with is to provide a V-shaped trough in the bottom of the Triple Bob.  This allows 2 contact points the length of the Triple Bob on the round bike frame about 15mm apart to provide a stable platform for the battery.  They also raised the threaded bolt holes for the battery mounts to perfectly fit the recesses in the mount so the bolts tighten down snugly with no gap between the battery mount and the Triple Bob.
Picture
Picture
There are slotted bolt holes to mount the Triple Bob to the water bottle mounts in the down tube and four different hole combinations so the Battery can be moved around up to 4 inches from the water bottle mounts to accommodate different battery positions on the downtube.
For even more flexibility in mount location and dramatically added strength, the Triple Bob also comes with recesses for hose clamps.  It even includes 2 different sizes of high-quality stainless steel hose clamps. They even include some flat shrink tube to dress up the hose clamps for a clean professional look that also protects the frame.  You can put up to 3 hose clamps on each Triple Bob.  Two is enough by themselves or one for extra strength if you are also using the water bottle mounts.

There is one other cool feature I should mention.  At one end of the Triple Bob is a chamfered, counter-sunk, bolt hole like the other ones but this one takes a flathead screw, also included.  This can go under a part of the battery mount that is flat such as the part on some batteries that holds a controller or the part where the power connectors are located. 
Picture
Another use for the Triple Bob is to mount a downtube battery in the smallest space possible on a frame that has no room to take the battery on and off once it is mounted.  This is a more or less permanent mount.  To do this first attach the battery mount to the Triple Bob.  Then attach the battery to its mount and lock it in place.  
Then position the battery in the frame and lock it down with hose clamps through the Triple Bob.  We do this all the time to install batteries in frames that are a tight fit with no room to take the battery off once mounted.  We used to do it with zip ties and holes drilled into the battery mount but Triple Bob's are so much better.  For more info on mounting batteries in a small triangle or full suspension bikes see this article.
So to conclude, here is a shout out to the geniuses at Grin Technologies that invented the Triple Bob and a lot more. Check them out. They are the goto place for hub motor solutions and have invented half of what they sell.

​
If your downtube battery is a little or a lot wiggly, there is a cure for that. :)
Picture
0 Comments

Do You Need a Gear Shift Sensor?

4/6/2020

0 Comments

 
Why have a gear sensor?  The purpose of a gear sensor is to protect your drive train from excessive power from a mid-drive motor while shifting a bike with a rear derailleur.  A normal cyclist is around 150 watts of human power and most drive trains are designed to handle a little more than that much power.
But now add 450 to 750+ watts from a mid-drive motor to that which is equal to another 3-6 cyclists and you are way beyond what the drive train was intended be able to handle when the chain is across multiple cogs with only a few teeth on one of the gears.  This is where a gear sensor comes in.
Picture
Shift Sensor installed on a bike (the shift cable passes through it)
It detects that you are shifting and cuts power to the motor for about an .8 of a second. This is long enough for the shift to complete before the power comes back on.

How does a gear sensor work?  To install the gear sensor you actually pass the shift cable through the gear sensor.  When the gear sensor detects cable movement, it sends a signal to the motor to stop for 800ms.  All Bafang mid-drive motors from Electrify Bike Co have a gear sensor cable coming from the motor controller so they are gear-sensor ready. If your motor does not have this cable you can hook the gear sensor up to a brake sensor cable instead.  Although this does work brake sensors shut the motor off for a minimum of about 2 seconds instead of .8 seconds.  This can be a bit of a nuisance to have the motor off for that long of a time.

I have a hub motor. Do I need a gear (shift) sensor?  If you have a hub motor you do not need a shift sensor since the hub motor does not use the drive train.

I have a rear derailleur with a Bafang mid-drive motor. Do I need a gear (shift) sensor?  Since you have to pedal through the shift on a rear derailleur drive train the motor will be on the whole time your are shifting.  If you happen to be in a mid to high level of motor assistant you could be putting upwards of 450 watts through the drive train. With a BBS02 or BBSHD this could be more than 1000 watts. This is where the shift sensor is critical. If you have a mid-drive that is under 400 watts or you only shift in levels of assistance that are under 400 watts then you might get by without one.
Picture
Gear shift sensor for a mid-drive motor
I have an internal gear hub (IGH). Do I need a gear (shift) sensor with my mid-drive motor?  If you have an internal gear hub like a 3-speed or 5-speed Shimano, you probably do not need a gear sensor since you are supposed to stop pedaling when you shift an IGH anyway.  When you stop pedaling the motor will stop and you can shift. Start pedaling again and the motor will come back on. Some motors have a slight delay after you stop pedaling before the motor shuts off so you should wait until it stops before shifting.  Electrify Bike Co. reprograms all of our mid-drive motors to cut off instantaneously when you stop pedaling so this is rarely an issue.  Some still prefer the instantaneous cutoff of a shift sensor but there is lag before the motor comes back on so it is a trade-off.

I have a TSDZ2 mid-drive motor. Do I need a gear sensor?  If you have a torque-sensing motor like the TSDZ2 then you do not need a gear sensor. Because the motor responds to the amount of torque you are applying to the pedals, you can simply ease off a bit when you pedal through the shift and the power will ease off as well.  If you need to be able to shift when pedaling hard with a torque-sensing motor then you may still want one. Since the TSDZ2 does not have direct support for a gear sensor, it must be hooked up to a brake sensor. The problem with this is that instead of 800ms the brake sensor cuts power for 1500 - 2000ms which can feel like an excessive amount of time to lose power.  But it does work!
0 Comments

Chainrings for Mid-drive Motors

4/5/2020

9 Comments

 
Picking the right chainring for your BBSHD, BBS02, or TSDZ2 is important but can be tricky.  There are a lot of factors to consider in getting the one that will be the best all around.  Let's take a look at some of the more important ones.
Picture
Lekkie narrow/wide chainring on BBS02
With a mid-drive motor you may have fewer gears
​
The front sprocket by the pedals is called a chainring.  With a mid-drive motor you take off your front chainring(s) with the cranks and bottom bracket and slide in the motor with its own chainring.  If you had more than one chainring you now only have one.  Let's say you had 3 chainrings up front and 9 cogs on your rear wheel.  ​
That is a total of 27 combinations or speeds.  With the mid-drive motor you typically have just one chainring which means your 27 speed is now a 9 speed.  This is not as bad as it sounds in fact in some respects it is desirable.  Riders find that they need fewer gears with electric assist and it is nice having fewer gears to shift through. 

If your bike originally had 3 gears up front and they were 52 tooth, 42 tooth, and 38 tooth, you might want to pick the middle or gear or 42 tooth chainring as the best all around.  If you still want a wide range of gears, especially low gears then you can trade out your rear cassette for a wider range cassette and have the full range you need.  You can read more about that here.

As it turns out most newer mountain bikes and now many city and road bikes have only a single chainring up front and a wide range cassette in the back.  This is known as a 1x drive-train.  So adding a mid-drive doesn't require any of the trade offs mentioned above.  In fact if you have an older bike you can look at going to a mid-drive to be a 1x drive-train upgrade as well.

If you really want more than one chainring it is possible.  It is actually common with the TSDZ2 motor in fact we sell dual chainrings for that motor.  It is less common with Bafang but is still possible.  The problem is many front derailleurs won't go out far enough to reach the outer chainring.  Since the TSDZ2 doesn't stick out quite as far as the Bafang motors more front derailleurs will work with the TSDZ2.  If you just want to have it on one or the other based on city or mountain riding then you can move it by hand before you start out.  The TSDZ2 comes with a 110 BCD spider.  You simply mount a different chainring on either side of the spider. After-market spiders are available for the BBS02 and BBSHD as well and dual chainrings can be used with them as well.  However, this is rarely done because of the cross-chain problems that arise from not using a single offset chainring.
Picture
TSDZ2 42T narrow/wide offset chainring
Picture
TSDZ2 30T narrow/wide chainring
Picture
TSDZ2 110 BCD dual chainring selection
Why are some mid-drive motor chainrings offset?  Each mid-drive motor comes with a chainring, usually steel and between 42 to 46 teeth.  This is usually a good size for all around riding and also 42 teeth is the typically the smallest you can go and have the chainring offset to return your chainline as close as possible to your original chainring(s).  This simply means that the motor pushes your chainring mount point to the outside and by dishing or offsetting the chainring they can move it back inboard closer to where your original chainrings were.  Chainrings smaller than 42T can't be dished because they would hit the motor housing so they are further outboard and the chainline will be off.  This is not a problem on many bikes but you want to try to keep the chain as straight as possible.  42T is simply too big for many mountain bikers so they get a smaller chainring for overall lower gearing and the chainline is still fine through much of the range but is more cross chained in the lowest (large) gears on the rear wheel.  Recently Lekkie introduced a 40T chainring  for both the BBSHD and BBS02 with great offsets achieved by replacing the gear reduction cover on the motor.  These are very nice but are more expensive and harder to install.

What size chainring is ideal?  The ideal chainring size can be illusive because you are making tradeoffs. The Bafang motors want to run fast and perform at their best with smaller chainrings while the TSDZ2 motors tend to top out at a cadence of 90 to 100 so a somewhat larger chainring for riders that like a fast cadence can be better.  If you just want overall lower gearing for mountain biking a 30-38T chainring is ideal.  However, if you have chainline issues then you may want to go with a 42T and make sure you have ultra-low gears in the back in the 40-46T range.  If you are a speed demon and want to feel like you are contributing and getting a good workout at higher speeds you may want a 48-52T chainring.  I say "want to feel like you are contributing" because even if you are pedaling very hard the wind resistance is so significant that the motor will be doing the lions share of the work but you will still get a good workout.
Picture
Lekkie 40T chainring with included motor gear reduction cover
Picture
Lekkie family of narrow/wide chainring upgrades for Bafang mid-drive motors
Should I upgrade my chainring?  This question may be answered for you if you choose a different size chainring than the one that comes with your motor.  If you want higher or lower overall gearing you need an upgrade.  Even if you decide you actually want the size that came with your motor, you may still want to get an upgrade.  The upgrade chainrings made by Lekkie and others are typically CNC 7075 T6 hardened aluminum and are lighter, better looking. They also have a significant advantage by using a narrow/wide tooth profile.  This means that every other tooth is wider or narrower to fill the entire space in the outer and inner chain links.  This has the advantage of holding the chain onto the chainring so that it doesn't come off.  If your bike had a front derailleur then you probably never had this happen because the front derailleur holds the chain on.  Without the front derailleur you may find your chain frequently or infrequently coming off of the chainring.  This is no fun.  Some bikes never have that problem.  We sometimes advise that want the size of chainring that comes with the motor to just run with the stock chainring to start out and then if they have their chain coming off they can upgrade to a narrow/wide tooth profile chainring to help solve the problem.  Chainguides can also be used and if your rear derailleur has a clutch that will also help to keep the chain from popping off.

What about IGH hubs?  All of the above applies to your chainring consideration except if your chain is properly tightened it won't ever pop off.  You may still want a chainring upgrade to get higher or lower overall gearing or to trim weight and have a better looking bike.
9 Comments

Picking the Right Ebike Battery

4/5/2020

0 Comments

 
The 3 most important factors in choosing a battery:

1. Trusted brand.  18650 Lithium Ion cells are by far the most popular cells found in ebike batteries.  This is because the energy density is very high and they are being manufactured in huge quantities.  They are being used everywhere including electric cars like Teslas.  There are many cheap lithium ion 18650 cells that don't last and can be very dangerous especially in the quantities found in ebike battery packs.  It is not uncommon for an ebike battery to have over 50 18650 cells. All it takes is one bad cell to destroy a pack and create a fire hazard.  This is why the manufacturer of the cells is extremely important.  
Picture
Brands like Samsung, Panasonic, Sanyo, LG are all excellent brands with excellent process and quality control.  You can't go wrong with any of these brands.  However, know your source.  There are knockoffs with the brand names printed on the cases so buy from someone you trust or that have a good reputation and others trust.
2. Power & Capacity.  How many volts?  How many Amps?  How many amp hours?  Without getting into how cells are made into battery packs if you know the answer to the first 3 questions you can calculate watts and watt hours which are the 2 most useful numbers.  We use 52 volt packs everywhere we can and only sell motors that can support them.  52 volts is like 48 volts after morning coffee.  It packs a little more punch and gets a little more speed out of your motor.  However, if you are not using the speed or power the extra volts transfer directly into increased range.  How does that work? It is simple math.  Volts x amps = watts.  Watts equal power.  Volts x amp hours = watt hours.  Watt hours = capacity or range.  Think of watt hours as how much gas you have in the tank and think of watts as how much power it can put out.  If you have a 2000 watt battery supplying a 750 watt motor but you are only asking it for 250 watts on your ride you have plenty of reserve power and your battery and motor will run cool.  If that battery happens to have 750 watt hours of capacity it will be able to power the bike for 3 hours at 250 watts.  3 hours x 250 watts = 750 watt hours.  If you were going 20 miles an hour that would mean your range was 60 miles.  See!  Simple math.
​
3. How big?  We always ask our customers 3 questions.  What is your average ride in miles?  What is your longest ride?  How many miles per week do you ride?  This gives us a pretty good feel for the best battery options.  If your longest ride is fairly frequent the you should pick a battery with that much range.  If however, the long rides are infrequent you many want to think twice about adding that weight to your bike for all of your shorter rides as well.  Sometimes it makes sense to get a smaller battery that will handle 90% or more of your rides and then get a second one to throw in your pack when you take longer rides or just want to know you have a spare tank.  Our most popular battery is the 52v 14ah Panasonic Super Shark.  We call this our 50 mile battery.  It is 728 watt hours and mounts on the down tube on water bottle mounts.  It fits in most bike frames but if it won't it can sometimes be put on the bottom of the down tube or on the rear rack.  A step up for those that need even more range is the 52v 17.5ah Panasonic Jumbo Shark.  We call this our 70 mile battery.  It is 910 watt hours and mounts just like the Super Shark.  For those that want to keep it light and most of their rides are under 15 miles, we have our 52v Samsung Mini-cube battery that fits in a saddle bag under the seat.
Picture
Picture
Picture
0 Comments

Choosing a Charger

4/5/2020

1 Comment

 
A few things to think about:  Better chargers usually come in a metal case and are fan cooled.  They come in different amperages which determines how fast your battery charges.  Charging too fast at too high of an amperage can shorten the life of your battery.  ​
Picture
If you don't know a lot about battery technology, it is best to buy your charger from the same company that you got your battery from.  The amp rating of the charger must be matched to the charging rating of the pack.  Not the max charge but the standard charge or lower.  Consistently charging at the max charge amps will shorten the life of your battery.  ​
This is why Tesla recommends that their cars not be charged at their super chargers very often.  They are intended for fast charges on road trips with routine daily charges taking place at a slower charger at home or in a parking lot.
​Electrify bike chargers come in 2 amp or fast charge 4 amp sizes.  4 amp chargers charge twice as fast as 2 amp.  A 52v 700 watt hour battery will charge in 3.5 hours with a 4 amp charger if it is fully drained.  The same battery will charge in 7 hours with a 2 amp charger.  All of the batteries sold by Electrify Bike including the mini-cubes can take a 4 amp charge without any negative impact on battery life.

Increasing the number of charge cycles: A smart charger can increase the number of charge cycles of your battery dramatically.  If you charge your battery to 100% every time, it will take about 400 charge cycles before the battery capacity is reduced to 85%.  This is 2 charges a week for 4 years.  Not bad!  You may want a new battery in four years anyway.  However, if you have a long commute and charge everyday you will exhaust your 400 charges in just over a year.  Did you know that if you only charge your battery to 90% you can get close to 1000 charges? Or if you charge it to only 80% you will get closer to 2000 charges?  This is true of all lithium ion batteries including your cell phone.  The problem is everyone is competing on talk time so they always max the charge to 100% instead of optimizing for battery life.
A smart charger is has a selectable amount of charge.  For example, Electrify Bike's smart charger have a rotary switch that is selectable for 80%, 90% and 100% charges.  We recommend charging to 90% unless you are planning a long ride.  For long rides top it off to 100%.  The occasional 100% won't have a big impact on battery life.
1 Comment

Need a Bottom Bracket Adapter?

4/5/2020

8 Comments

 
Mid-drive motor kits mount in the bottom bracket of your bicycle.  They are designed for a standard threaded 68/73mm bottom bracket but if yours is different chances are there is an adapter you can use to make it work.  BBSHD, BBS02 and TSDZ2 mid-drive motors all mount in a threaded bottom bracket. ​
Picture
​The bottom bracket is where the bearings for the cranks that your pedals attach to are located.  To install a mid-drive motor you remove the cranks and bottom bracket spindle and bearings.  The mid-drive motor then slides into the bottom bracket shell and replaces all of that except for the pedals.  Before 2013 most bottom brackets were the BSA/JIT English threaded standard.  This is still the most popular type and is the type that mid-drive motors are designed for. Most bikes that originally sold for less than $1500 or are older than 2013 have English threaded bottom brackets and the motors will slide right in. If you have a square tapered spindle for your cranks then you have the required threaded bottom bracket.

Around 2012 many higher-end bikes started being fitted with various press-fit bottom brackets many of which can be adapted to English threaded so you can still do a mid-drive motor conversion on them. However, there are some exceptions. For an in depth article on adapting various bottom brackets and the exceptions see this thorough article by Matt Hughes


Electrify Bike Company carries threaded one piece adapters for 68 & 73mm BB30, 68 &73mm PF30.  We also carry a 2 piece BB30 and PF30 for wider bottom brackets that use those standards.  We also stock a 2 piece PF41/BB92 that works with a variety of bottom bracket widths that use that standard.

Picture
Picture
Some newer bikes and almost all fat tire bikes use a bottom bracket that is wider than the 68/73mm standard.  In this case only the BBSHD comes in wider widths to accommodate this  EBC stocks the BBSHD in 68/73mm, 100mm, and 120mm.  Other widths can be accommodated with these 3 types by using bottom bracket spacers when required.  TSDZ2 and BBS02 motors have after market extensions available for them to allow them to fit wider bottom brackets but these can be very difficult to install.

If you have an older style Schwinn or cruiser bike with a one piece crank and American style bottom brackets we have something for you as well. Give us a call.

Installation tips:
We recommend using sleeve Loctite like Loctite 641 when installing the adapter into your press-fit bottom bracket.  This is like thread lock but is specifically for sleeve inserts like these adapters.
The 2-piece adapters can be tapped in with a soft mallet. Tap all the way around and ensure that it goes in straight.  A bottom bracket press can also be used.  For the one piece adapter we recommend using a bottom bracket press. Ensure that it does not get crooked or it can bind up and be very difficult to straighten up or remove.  If you do not have access to a bottom bracket press you can make one with hardware available at a hardware store.  An example can be found on YouTube here.
8 Comments

Installing Rivnuts in Bicycle Frames

2/16/2020

0 Comments

 
For Water Bottles, Tools, and Electric Bike Batteries

Ever wish your water bottle mounts were in a different place?  Maybe your battery mounts don't line up with water bottle mounts? Do you wish you had at least one more mount point for your battery so you don't worry about it when you hop a curb or hit a rough patch?  At the end of this article are several solutions for adding/moving water-bottle mounts that are easy to install. This article is about rivnuts which are a little more work but provide a clean, strong and professional result. Rivnuts are what many bike manufacturers use to add bolt-on mount points to their frames, especially in the triangle. These are small threaded sheet metal inserts used in aviation, automotive, motorcycle and bicycle manufacturing to attach things to metal tubes and sheet metal.  Bicycle manufacturers specifically use them to add water bottle mount points to their frames.
Picture
So why not just use the water bottle mount points already on the frame?  You may not have water bottle mounts or perhaps the ones you have are in the wrong place. Your battery may not fit where your water bottle mounts are located or maybe one of your mount points works but the other one needs to be on the other side.  ​

Maybe you are mounting something different like a bike accessory or tool. You may have looked at other alternatives like big zip ties or hose clamps but you are not building a Frankenbike and want your build to be clean and professional with a factory-like fit and finish.

Some have expressed fear of weakening the frame by drilling holes in it.  If done properly with the right kind of rivnut, the rivnut adds strength back to the frame around the hole.  If you use steel rivnuts on an aluminum frame it is actually stronger than the metal it replaces. We recommend steel rivnuts for heavy loads like batteries as they are a lot stronger than aluminum rivnuts.  See below for links to buy a rivnut kit so you can easily do a perfect job.

Whether welded, glued or riveted on, threaded mount points on a bicycle are all referred to as braze-ons.  Since we are adding a threaded mount point to a bicycle frame you can actually use this technique for any location on your bike frame that you wish you had a braze-on.  However if the braze-on is elevated as a brake or rack mount point rivnuts won’t work. I would also discourage their use on chain and seat stays unless they are exceptionally beefy.

Ok, with that background let’s get down to business.  Water bottle mounts in most modern bikes use M5 bolts with a .8mm thread pitch.  The bolts are typically 10-12mm long. You can use longer up to the diameter of your frame.  The rivnuts we recommend at Electrify Bike are zinc plated carbon steel. These are super strong.  You can use aluminum rivnuts, which are often used for water bottles, but when you are looking at mounting a 7lb or 4kg battery and jumping curbs or mountain biking, steel threads are what you want.  Really good ones can cost close to $5 a piece. Here is a link to buy 150 on Amazon for less than $10 that although not the highest quality, they are excellent for the job. They are zinc plated carbon steel, thread diameter 5mm .8 pitch.  A critical spec on rivnuts is grip range. These have a grip range of .5mm to 5mm. That means it will grip any sheet or tube metal that is from .5 to 5mm thick. That pretty much covers any bike frame I have ever worked on. Some have complained that their rivnuts spin on them.  They either had the wrong grip range or they didn’t compress them enough when they installed them. If you have used the right grip range and they become loose or spin on you, you can always compress them more to tighten them up. These rivnuts are 7mm in diameter and 13mm long before compression.

Ok, let's get started.  With the battery or item you are mounting, hold it up to the frame.  Check clearances including clearances needed to take the item on and off if it is removable.  Mark the locations. If possible space the rivnuts 2.5 inches apart as this is standard water bottle spacing on a bicycle.  Mark the hole location in the center of the frame. Use a center punch or old drill bit to make a small indent so the drill bit will not wander.  Drill a pilot hole with a small bit first. Then drill the final hole with 7mm or 9/32 drill bit for an M5 rivnut. Drilling holes in the triangle often present clearance issues with the drill and bit.  You may need a right angle drill and short bit. (See below for a link to a nice and inexpensive one.)

To install the rivnut you will need a rivnut tool.  Follow the directions for your particular tool. Chances are you can find a video on youtube.  There are several videos on how to install a rivnut without a tool but it can be tricky. I have done it many times but prefer the tool in the link below.
​

You can pay as much as $5/each for zinc plated steel M5 rivnuts.  Once again, here is a link to get 150 for under $10.

https://www.amazon.com/gp/product/B07HCV9PPH/ref=ox_sc_act_title_1?smid=AUGKL3EVR9OAM&psc=1

  • Product Name: Rivet Nut; 
  • Material: Carbon Steel, Zinc
  • Thread Diameter: 5mm; 
  • Total Length: 12mm
  • Grip Range: 0.5-5.0mm; 
  • Body Diameter: 7mm
  • Application hole size: 7mm; 
  • Weight: 36g
  • Package Content: 150
Picture
Drilling holes in the triangle often presents clearance issues with the drill and bit.  You will need one of these 90 degree drill attachments with a hex shank 7mm or 9/32 drill bit.  A 90 drill can be fairly pricy but this attachment is fairly cheap.

https://amzn.to/2lLgvkJ
Picture
Stepped drill bits like the ones below are short and work well in restricted spaces like a bike triangle. They also drill their own pilot hole, and have a hex shank for the above 90 degree drill attachment.  Note the step bit one on the left has a 9/32 step.  Be careful not to go one step too far or the hole will not be usable. It helps to mark the step you want to stop on with a sharpie.
Picture
Here is a nice rivnut tool that rarely has clearance issues in the bicycle triangle.

http://www.aircraftspruce.com/catalog/topages/rivetnut12-03708.ph
Picture
Electrify Bike Company sells other products for easily adding water bottle mounts.  They are very strong but not as clean.

https://www.electrifybike.com/store/p83/Bottle_Bob_Water_Bottle_Positionable_Mount_Brackets.html#/
Picture
https://www.electrifybike.com/store/p161/Triple_Bob_Water_Bottle_Positionable_Mount_Brackets.html#/
Picture
These B-RAD products from Wolf-Tooth Components are great for moving the water bottle mounts up and down the frame but are not strong enough for mountain biking with a heavy battery. 

https://www.electrifybike.com/store/p60/B-RAD-Mounting-Base.html#/
Picture
Here is a video of installing a rivnut on a bike. He does a good job but don’t pay attention to his improper use of a center punch. You have to press harder or use a hammer.

RJ the bike guy​
0 Comments

    Mark L Ostlund

    Author

    Archives

    February 2021
    April 2020
    February 2020

    Categories

    All

    RSS Feed

Services

Ebike conversions
Ebike repair
Ebike accessories

Company

About
The Company
Contact

Sales

Products
Ebikes
Accessories

Info

News Magazine
Blog
Privacy Policy
© COPYRIGHT 2018. ALL RIGHTS RESERVED.
  • Shop
    • Mid-Drive Motor Kits >
      • BBS02/BBSHD - BAFANG
      • TSDZ2 - TONG SHENG
      • CYC MOTORS
    • Batteries
    • Parts & Accessories
    • Specialty Kits >
      • Xtracycle Kit
      • Madsen Kit
      • Cruiser Kit
      • Airline Travel Kit
      • Cargo Bike Kits
    • E-bikes >
      • Electric Mountain Bikes
      • Electric Fat Tire Bikes
      • Electric Cruiser Bikes
      • Electric Cargo Bikes
      • Tandem Electric Bikes
    • Scooters
    • Conversion Quote
    • All Products
  • Rentals
  • Info/Blog
    • E-bike Conversion 101
    • Electrify Blog
    • Technical & DIY Info
    • Manuals & Resources
  • E-Bike Gallery
  • About
    • About Us
    • Contact
    • Customer Reviews