


INSTALLING RIVNUTS IN BICYCLE FRAMES
For Water Bottles, Tools, and Electric Bike Batteries
Ever wish your water bottle mounts were in a different place? Maybe your battery mounts don't line up with water bottle mounts? Do you wish you had at least one more mount point for your battery so you don't worry about it when you hop a curb or hit a rough patch? At the end of this article are several solutions for adding/moving water-bottle mounts that are easy to install. This article is about rivnuts which are a little more work but provide a clean, strong and professional result. Rivnuts are what many bike manufacturers use to add bolt-on mount points to their frames, especially in the triangle. These are small threaded sheet metal inserts used in aviation, automotive, motorcycle and bicycle manufacturing to attach things to metal tubes and sheet metal. Bicycle manufacturers specifically use them to add water bottle mount points to their frames.

Some have expressed fear of weakening the frame by drilling holes in it. If done properly with the right kind of rivnut, the rivnut adds strength back to the frame around the hole. If you use steel rivnuts on an aluminum frame it is actually stronger than the metal it replaces. We recommend steel rivnuts for heavy loads like batteries as they are a lot stronger than aluminum rivnuts. See below for links to buy a rivnut kit so you can easily do a perfect job.
Whether welded, glued or riveted on, threaded mount points on a bicycle are all referred to as braze-ons. Since we are adding a threaded mount point to a bicycle frame you can actually use this technique for any location on your bike frame that you wish you had a braze-on. However if the braze-on is elevated as a brake or rack mount point rivnuts won’t work. I would also discourage their use on chain and seat stays unless they are exceptionally beefy.
Ok, with that background let’s get down to business. Water bottle mounts in most modern bikes use M5 bolts with a .8mm thread pitch. The bolts are typically 10-12mm long. You can use longer up to the diameter of your frame. The rivnuts we recommend at Electrify Bike are zinc plated carbon steel. These are super strong. You can use aluminum rivnuts, which are often used for water bottles, but when you are looking at mounting a 7lb or 4kg battery and jumping curbs or mountain biking, steel threads are what you want. Really good ones can cost close to $5 a piece. Here is a link to buy 150 on Amazon for less than $10 that although not the highest quality, they are excellent for the job. They are zinc plated carbon steel, thread diameter 5mm .8 pitch. A critical spec on rivnuts is grip range. These have a grip range of .5mm to 5mm. That means it will grip any sheet or tube metal that is from .5 to 5mm thick. That pretty much covers any bike frame I have ever worked on. Some have complained that their rivnuts spin on them. They either had the wrong grip range or they didn’t compress them enough when they installed them. If you have used the right grip range and they become loose or spin on you, you can always compress them more to tighten them up. These rivnuts are 7mm in diameter and 13mm long before compression.
Ok, let's get started. With the battery or item you are mounting, hold it up to the frame. Check clearances including clearances needed to take the item on and off if it is removable. Mark the locations. If possible space the rivnuts 2.5 inches apart as this is standard water bottle spacing on a bicycle. Mark the hole location in the center of the frame. Use a center punch or old drill bit to make a small indent so the drill bit will not wander. Drill a pilot hole with a small bit first. Then drill the final hole with 7mm or 9/32 drill bit for an M5 rivnut. Drilling holes in the triangle often present clearance issues with the drill and bit. You may need a right angle drill and short bit. (See below for a link to a nice and inexpensive one.)
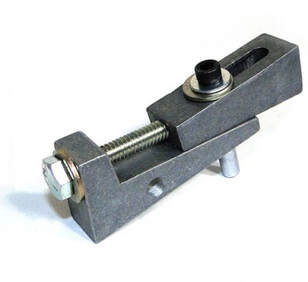
To install the rivnut you will need a rivnut tool. Follow the directions for your particular tool. Chances are you can find a video on youtube. There are several videos on how to install a rivnut without a tool but it can be tricky. I have done it many times but prefer the tool in the link below.
You can pay as much as $5/each for zinc plated steel M5 rivnuts. Once again, here is a link to get 150 for under $10.
Link to Product
- Product Name: Rivet Nut;
- Material: Carbon Steel, Zinc
- Thread Diameter: 5mm;
- Total Length: 12mm
- Grip Range: 0.5-5.0mm;
- Body Diameter: 7mm
- Application hole size: 7mm;
- Weight: 36g
- Package Content: 150

Link to Product


Link to Product

RJ the bike guy
|
|
Ah! Now I have a possible answer to adding mounting points for a rear fender on a Poseidon Redwood which are lacking. Front mounting points — great! Rear — not so.
I thought I’d hit the jackpot with M5 rivnuts with a wide enough grip range for what I need, unfortunately the ones you’ve linked to only do up to 5mm thickness in M10 size. Check the chart on the listing (M5 – H 0.5-3). The search goes on. Very informative article though!
Leave a comment